Visual Merchandising 101

What’s the first picture that comes to mind when you think of Visual Merchandising?
Is it some hoity-toity store in a high-end mall selling watches for the price of a Nighthawk Custom? Don’t laugh, but they’re probably making way more margin dollars selling the watch (and with no 4473 form to fill out) than we do selling the Nighthawk Custom (which provides some or our best margins).
From now on, when you think of visual merchandising, think of it as a salesman you don’t have to pay, who actually shows up to work every day, has a good attitude and gives your guests the message you desire. This should put you in the mood to focus more on what visual merchandising can accomplish for you.
Small Increases Pay Big Dividends
Ready to learn some tricks to increase your profits? Let’s start by looking at how successful you are at converting guests who walk through your door into paying customers, commonly called your conversion rate. Good news: It doesn’t take a lot of change in your conversion rate to make a difference to your bottom line.
For easy math, consider you have 90 transactions in a day, each ring averaging $100. This puts your daily sales at $9,000. If we can increase your conversion rate by just 1%, it would give us three more rings per day — that’s $300 extra in sales every single day you’re open for business.
The other way to put visual merchandising to use is to raise your average ticket value. Just like your conversion rate, a small increase pays big dividends. If we use the above numbers, but instead of having an average sale of $100, we get an extra measly $2.50 per transaction, it puts an extra $225 per day in the register. Combining our 1% increase in conversation rate with a $2.50 increase per ticket gets us to $525 per day. If you’re open the standard 357 days a year, that’s over $187,000, from a 1% conversion increase and $2.50 increase to your average transaction amount. Are you a little more interested in visual merchandising now?
“Good news: It doesn’t take a lot of change in your conversion rate to make a difference to your bottom line.”
Get A Baseline
If you really want to attack youvr conversion rate, you need to know where you are currently. To do this, you need a customer counter; they’re really cheap (like $200), depending on how much sophistication you want. Some deluxe models provide an extreme amount of valuable information, which can help with staffing levels for different hours of the day or seasons, identify what areas of the store are under-visited by customers and more — including heat mapping your sales floor.
After you install a customer counter, be prepared for the avalanche of employee complaints that will follow, such as it won’t be accurate due to staff coming and going (have them use an employee door if possible), customers going back and forth to the car, etc.
The important point is to set a benchmark we can monitor for improvement, not the actual number of door swings.
With a baseline established, how do we improve it? Look around; when was the last time your store (or at least a department) was changed? Many retail segments plan to change showroom displays once a quarter; I’m convinced many in our industry are on the once-a-decade plan.
Start With Your Entrance
Visual merchandising starts with your entrance. It should be clear and inviting, not only allowing customers to see into your store but with a view enticing them to come in. Some new shoppers to your business may hesitate to enter. Keep in mind many people won’t go through a door when they can’t see what is on the other side.
Once your guest is in the door, do you allow a space for them to decompress? As they come into your store, the average person will take two to three steps into the space to get a feel for it, allowing their eyes to adjust to the lighting difference between the outside and the showroom. Hopefully, your store has good lighting, so this won’t be a long process. Also, don’t bombard them with signage and large displays at the entrance. (Putting large displays at the front of your showroom makes it feel smaller.) This may seem counterintuitive for an article on improving sales to suggest leaving this front decompression area void of signs and displays, but it’s a case where “less is more.”
Endcaps: Best Practices
Once our guest is in the decompression zone, what do they see? Are there enticing endcaps or shiny gun displays at the rear of store to draw them in? Endcaps have huge sales potential; this space is so key to selling product, other retail industries charge manufacturers to put their product on endcaps. Pick a few good endcaps and remerchandise them with in-season product; put out signs to tell the story about why this product deserves this space. It can be as simple as a “New item!” or “We overbought, and the savings are yours,” or “Make cleaning your deer easy this year.”
Signage on endcaps can increase sales up to 30% or more. Next time you’re in a big-box store, notice how the endcaps are signed — are yours? Endcaps are prime for new items. You’re not operating a museum; customers come in to see what’s new, so highlight it.
Moving your aisles to a wishbone or angle will make endcaps even more powerful. Angled displays catch the eye — customers don’t need to turn their head 90 degrees to see standard displays. A customer walking past an angled display not only sees the endcap but also about 4′ of the aisle display. Of course, like anything in life, there’s a tradeoff: The increase in great selling space by angling aisles comes with an increase in the amount of floor space needed to create angle displays.
“Good news: It doesn’t take a lot of change in your conversion rate to make a difference to your bottom line.”
“Eye Level Is Buy Level”
How tall are your fixtures? Retail standards are 54″–66″. Personally, I advocate for 60″ or less since they provide the best sight lines — which allow shoppers to see the whole retail area from the entrance, making your store feel larger. A 60″ height also takes away hiding areas from shoplifters.
Looking at the other end of the spectrum, do you have product displayed below knee level? 80% more products will be selected with eye level vs. bottom shelf; always remember the old saying, “Eye level is buy level.” Use bottom shelves for large items or low-margin items.
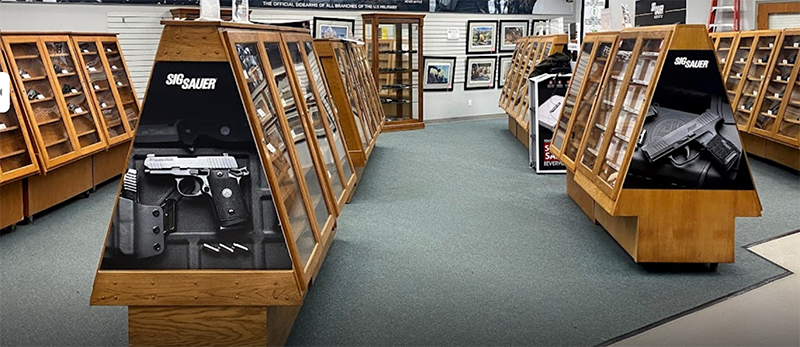
One of the very early adopters of this concept was Miles Hall, founder of H&H Shooting Sports in Oklahoma City. In 2001, Hall wanted a better way to display handguns, so he came up with a unique design. In true, low-cost entrepreneur style, Hall asked his son, Nicholas, to build them in his high school wood workshop class. Besides displaying the handgun’s belt buckle at eye level, his cases promoted the shoulder-to-shoulder selling method so popular today. (Oh, and it would hold up to 60 firearms in each case.)
I would highly recommend moving at least some of your firearms displays to this method, even if only to highlight different models. Don’t want to build your own? Many firms like Ram Craft offer walkaround display cases that present products on the “buy level.”
Don’t forget the used-fixture market. With many retailers in other markets failing, used display cases might be available.
When I operated my gun store, one of my best cases came from a Montblanc ink pen display I got from an Office Max store that closed. This standalone display would turn slowly under bright LED lights, highlighting the ink pens. We repainted it and displayed high-end knives instead of ink pens. I paid $100 for the display — thinking about how much money was made off it still puts a big grin on my face.
Make Dump Bins More Effective
Let’s go from high-end to dump bins: Don’t overlook this proven method of visual merchandising that has been around since the beginning of retail.
What makes an effective dump bin? The best dump bins, of course, have pertinent signage telling your guests why the items in the dump bin are at a reduced cost. Merchandise is filled to the top or near the top of the bin; many models have adjustable bottoms for this purpose. They need to be where your traffic is to be effective.
“Use mannequins in display apparel. Research indicates apparel sales increase with the use of mannequins by anywhere from 10% to 35%.”
Closing Thoughts
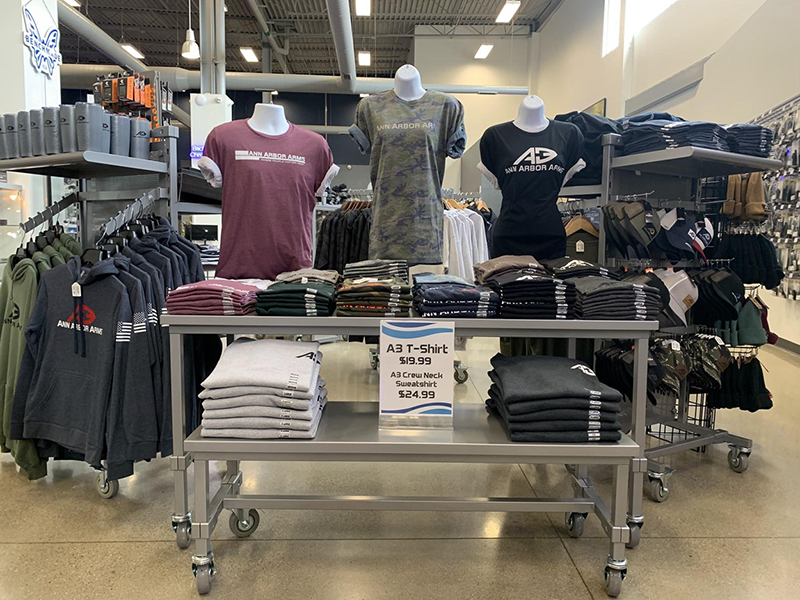
We’re going to close with some tips courtesy of Sarah Parkhurst, director of business operations at Ann Arbor Arms, in Ann Arbor, Mich. Prior to joining Ann Arbor Arms, she spent 12 years at Cabela’s, most of them in visual merchandising.
For apparel displays, Parkhurst follows the “rule of three” which says items arranged in odd numbers are more attractive, memorable and more engaging to the eye than even-numbered groupings. When a person sees an odd number of items, his/her eye is forced to move around more — creating a much more interesting visual experience.
A final tip from Parkhurst: Use mannequins in display apparel. Research indicates apparel sales increase with the use of mannequins by anywhere from 10% to 35%. With the high margins on apparel, think what a 10% to 35% increase in apparel sales would do to your bottom line.
Keep in mind: Even small changes will result in incremental profits over the long-term. Put virtual merchandising to work for you, and reap the benefits!